 If you are not using the Table of Authorities builder in Microsoft Word, you should be. Manually creating this table (and managing to keep it updated when changes are made to the brief) is an impossible task. If you are using it, and are having difficulties, like I was today, here are some quick tips:
*Deleting All Table of Authorities Field Codes
I recently worked on a brief that was written with a lot of cutting and pasting from other documents. There were existing Table of Authorities codes and they weren’t marked exactly right. Frankly, I just wanted to remove the codes entirely and start over. That was very easy to do in only a few steps.
1. Click the Show/Hide tool on the Paragraph section to show the paragraph markers (mine are always on, but if yours are not, this will not work if you don’t do this)
2. Open the Find and Replace dialog box (you can press Ctrl+H)
3. In the “Find What” section, enter ^19 TA
4. Leave the “Replace With” section empty
5. Click Replace All
That’s it! Your Table of Authorities codes are gone.
I had a second issue with this brief. When I went to mark the first cite, a Rule, the Rules category was missing from the category choices. I only had Cases, Statutes and Other Authorities. If this happens to you, you can fix that too!
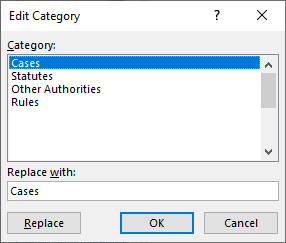
*Adding Table of Authorities Categories (image above)
1. Display the Mark Citation dialog box but either choosing a citation to mark, or by pressing Shift+Alt+I.
2. Click on the Category button. Word displays the Edit Category dialog box
3. In the Category list, place your cursor in a blank space below the list already there. For example, in the photo, my cursor would be placed immediately below Rules.
4. Type the name of the new Category you want in the Replace With box and click on Replace.
5. Your new Category now appears in the list. Click OK and you are done!
Call us at Integrated Technology Services, LLC for your training needs in Microsoft Word, Adobe Acrobat and much m
